
|
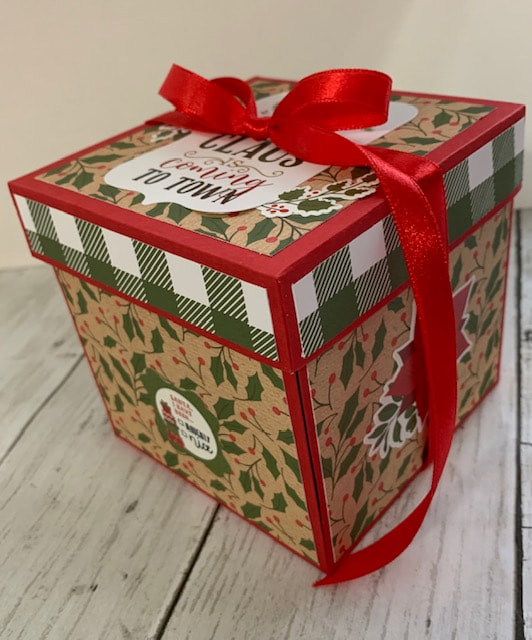
Start with a 12x12 piece of Cardstock and you will need score at 4" and 8", turn it one turn and score at 4" and 8". On each corner from one score line to the other mark and cut away part of that corner piece. I show you exactly how in the video.
Mats are cut at 3 3/4"x3 3/4" you will need a total of 11 pieces. With two of the pieces you will split them from one corner point to the other to make a triangle to glue on to of the inside pockets. To make the top your cardstock is 8 1/4"x8 1/4" you will score at 1 and 2 inches on all 4 sides. Cut away the 3 outside squares on each corner leaving the one tab to glue the top together. Glue the tabs together and then fold the end piece over to reinforce the top. Cut your mats for the sides at 3/4"x3 3/4" and glue on. Glue the top mat on and decorate. I tied mine together with a ribbon, but you can leave it as is. Thanks so much, E
4 Comments
Nancy Boatwright
12/17/2019 09:17:28 pm
Thank you so much. I just watched your video and just made a box. Love it!
Patricia Gibbs
12/18/2019 03:11:54 am
Edith this little exploding box is absolutely gorgeous, I love it and will try my very best to prepare the cardstock sometime today (Wednesday 18th), and make them up (I need two) on Friday. Thank you so much for a brilliant idea xx
Mary Reese
12/19/2019 09:07:31 pm
Edith you do so many beautiful things. I can always count on you to make crafting fun and you make it so easy to follow it’s a gift you have and I’d like to thank you for sharing it with me.
Linda Vassiliou
12/22/2019 01:45:10 pm
This is a great idea. Thank you so much for sharing. I have made 2 completed and one needs matting, I especially love the reinforced lid it looks very professional. I'm going to fill mine with chocolates for family members and they will have a lovely box after Christmas. Thank you again Leave a Reply. |
AuthorI am a crafter, teacher, business woman, mom, nana and wife to a wonderful man. I love to teach what I know to others and share any inspiration that I can. I believe crafting is therapy. Thank you so much for your support. Archives
April 2024
Categories |
 RSS Feed